
Stickers are among the most versatile and cost-effective ways to get the word out. You’ve seen it yourself: well-placed stickers on cars, signs, door jambs, or a dive bar bathroom stall can get more eyes than online PPC ads. As with most print media, stickers offer the added benefit of having a longer shelf life for a low one-time cost. That bumper sticker on the back of your car won’t incur a monthly fee and will be sending the message until you peel it off or the print fades.
Stickers vs Labels: What’s the Difference? Stickers mostly have graphics and labels offer information like an address, logo, or phone number for example. For the purpose of this article, since the process for printing stickers and labels are quite similar, we’ll use stickers and labels interchangeably. Without further ado, let’s jump right into it – we’ve broken everything down into three easy sections:
- PAPER: What paper should I use?
- PRINTER: What is the best printer for printing stickers?
- PROCESS: What is the best way to print out my stickers?
How can I print my own stickers?
1. FIRST, PAPER.
First, you need to think about the proper medium to print your stickers on. Stickers are commonly printed on either paper or vinyl. Knowing the differences between them will help ensure you get the results you want.
Note: Did you know that some label papers are handwrite only?
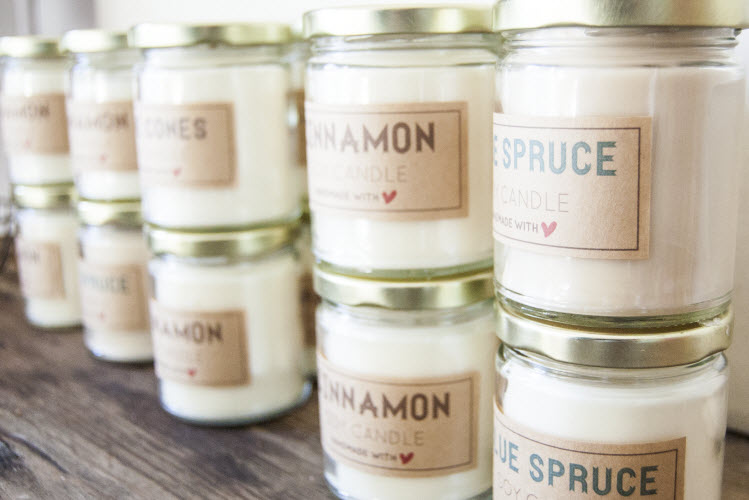
Paper labels. These are the simplest and cheapest form of stickers. Paper labels are also great for vinyl record sleeves, personalizing name tags, creating instant photo stickers, and dozens of other creative ideas. Not sure what sticker paper to buy? You can choose between pre-cut labels (ie. Avery labels) and whole sheets of sticker paper (like our LD Photo Sticker Paper). Both are easy to use when printing stickers from home. Avery has pre-cut stickers if you need:
These pre-cut labels are great for jars and bottles and give personality to homemade goods. If you do not want a white border around your stickers, clear glossy sticker paper is your best option. Clear sticker paper is great for printing transparent stickers and looks great on windows, clear bottles and product labels.
If you prefer cutting the stickers yourself, opt for whole sheets of sticker paper.
With whole sheets of sticker paper, it pays to start thinking about how you’re going to cut your stickers. If all you need is a straightforward rectangular or square sticker, a normal cutter should work. However, if you’re thinking about something with more detail, consider a Cricut Machine. Remember to leave enough room in between stickers when designing your sticker template.
If you need water-resistant sticker labels: In most instances, printable paper labels are not water- or weatherproof, and therefore won’t hold up well to the elements. If you need water-resistant stickers, look for matte label paper AND be sure to use a printer that uses pigment ink (and no it’s not a good idea to use pigment ink on a dye ink printer). Pigment ink is widely known for it’s archival properties. Pigment-based ink sticks to paper better than dye-based ink which makes it more water-resistant and fade-resistant. You can read more about the differences between dye and pigment in our Paper and Ink article.
Once you’ve printed out your stickers, the best way to protect your stickers from water or direct sunlight is by laminating them. There are a couple ways to do this, you can either buying clear laminating sheets, which is a clear plastic film that lays on top of the sticker, or use a thermal laminating machine, which is more convenient if you are printing in bulk. If you are on a budget, go the sheet route – we recommend buying a clear laminating sheet that is slightly bigger than the sheet of paper you printed your stickers on because it’s easier to work with. So if you printed out your stickers on a piece of 8.5″ x 11″ paper, look for a laminating sheet that is 9″x 12″. To use the laminating sheet, just peel it off, place the sticky side face up and lay your stickers on top. Then use a squeegee, ruler or credit card to apply pressure to the back of the sticker sheet (adhesive side) to remove any air bubbles. Then just cut out your stickers, peel off the sticky backing and you are all set, now your stickers are super durable and water-resistant!
Can you print stickers with a laser printer? Certainly! Just be sure to get the right type of sticker paper for the job. Using an inkjet label paper on laser can melt and ooze the adhesive onto your laser printer and cause irreversible damages.
Make sure you use inkjet sticker paper for inkjet printers and laser sticker paper for laser printers. These are not interchangeable. Inkjet sticker paper melts when you use it on a laser printer. If you want to use your laser printer to print stickers, make sure you get the appropriate laser-friendly sticker paper.
Vinyl stickers. Inkjet printable vinyl paper offers an affordable solution for creating vinyl stickers from home and is the most durable of the sticker paper options out there. Vinyl stickers are great for everything from production labels, bumper stickers, laptop stickers, water bottle stickers, promotional stickers and more. Home printed vinyl stickers can be waterproofed using laminate and clear coat spray paint like Krylon or Mod Podge, making them stand up to the outdoors better than unfinished paper labels. However, they may fade quicker than many professionally printed vinyl stickers due to the longevity of the ink. Most vinyl adhesive papers will give you information on their intended use as part of the product description. There are also several great tutorials online to make your own vinyl stickers from home or office, but the steps are pretty similar to printing on regular sticker paper.

What about decals? Decals are designed to be used outdoors and have a permanent adhesive. One major thing that divides the two is the transfer process each uses. Stickers are peeled away from a waxy paper backing and applied, whereas decals are transferred onto surfaces directly (and the backing is then removed). If you want to have die-cut script lettering with your brand applied to your windshield, a decal is what you’re looking for. For more on the benefits decals offer, check out this article from WebSticker. You can also print decals from home but it’s a more tedious process. Wikihow has a basic list of steps if you want to try it out.
Note: When deciding which paper to use, you need to think about whether or not it’s compatible with your printer. Some printers only take specific kinds of paper so be sure to check your printer’s manual before spending on anything.
2. SECOND, PRINTER.
What is the best printer for printing stickers?
Do you have the right printer for the job? It depends on your sticker’s design but usually a 4-color inkjet printer with a 1200 dpi print resolution will more than suffice. In the less likely event that your sticker design requires dynamic color ranges and requires more tonal variation, look for a printer with no less than 6 cartridges. Here are some of the best printers for stickers.
Best Budget Inkjet Printer
Canon® PIXMA® TR8620 – Buy on Amazon
Canon’s PIXMA TS6220 offers vibrant color prints at an incredibly low operating cost and is a great entry-level machine for any small business owner or amateur photographer. The printer uses five separate ink cartridges, sold in both a standard and a high yield, or XL, size. Canon offers their high yield cartridges ranging from $19.99-$24.99* apiece, but you can get a reputable compatible from LD Products for as lows as $11.99. Printing a range of sticker types and sizes from a tablet or smartphone is quick and convenient with it’s easy to use wireless connectivity.
HP® Envy® 6055 – Buy on Amazon
The Envy 6055 is a very affordable printer that can produce the stickers you need at the price you want. You can easily print anything straight from your mobile device with this wireless printer (and many more, being that it’s a multi-function printer). Unlike the Canon PIXMA TR8620, the Envy 6055 only has two cartridges: black and tricolor, offered in a standard yield and high yield size. Print more pages for less with LD InkPods replacement ink cartridges from LD Products, available here for a fraction of the HP price!
Medium Range Inkjet Printer
Canon® PIXMA® Pro-200 – Buy on Amazon
Canon’s Pixma Pro-200 series is considerably more expensive than the previously mentioned Pixma printer, but for the price, you get more advanced features and even better print results. Its 8 dye-based ink cartridges offer an expanded color gamut, giving your stickers a rich range of color and fine grained detail. A black, gray and light gray cartridge work together to produce high quality monochrome prints and a built-in Chroma Optimizer maintains their natural color. The Pro-200 supports wide format prints up to a 13”x19” print size and is compatible with a ride range of paper types. Canon sells each CLI-65 cartridge for $13.99. Affordable compatible versions of the CLI-65 will be available from LD Products soon!
Professional Grade Inkjet Printer
Epson® SureColor® P600- Buy on Amazon
The SureColor P600 offers incredible print results and a generous page yield, perfect for creating professional grade stickers and photos. The initial price point and operating costs are expensive, but the trade-off in quality may be worth it for your business. Each Epson UltraChrome HD pigment ink cartridge goes for around sixty dollars apiece. Compatible with a range of media sizes, including 13”x19” wide borderless photos, this printer should be a welcome addition to any creative’s workspace. Save money with LD-brand compatible cartridges for your Epson SureColor printer, available for just $16.99 each.
Just to reiterate what we mentioned earlier, make sure your paper is compatible with your printer. Do not use inkjet sticker paper on your laser printer. The results can be disastrous and can even result in a broken laser printer.


3. THIRD, THE PROCESS.
You can create your sticker design using whatever application or image editing software you’re familiar with. But like anything you attempt to do yourself, sticker printing can get costly if you don’t do it right the first few times. To help avoid this, here are a few very important things you should remember.
Tip #1: Color match. The accuracy of your colors will rely heavily on the print process you selection. CMYK (cyan, magenta yellow and black) is most commonly used for home printing and budget-friendly professional presses. This process involves layering color ink in dots until it creates the desired color on the page. For example, to make green, small dots of cyan are sprayed on the page and then dots of yellow. Nearly all home and office printers use CMYK processing, and even professional-grade photo printers use a similar concept (though with far more ink color diversity). CMYK processing will give you good, color accurate results at a reasonable price.
A second option for vinyl stickers is Pantone® color. Pantone is a superior option for total color correctness and consistency, especially for stickers that involve a large area of solid color. While upwards of 10 percent of CMYK tones can be lost, Pantone is as close to accurate from screen to sticker as you can get. Not surprisingly, it can also come with a premium price tag for custom designs, and really isn’t something you can easily produce on your own. You wouldn’t use Pantone for, say, custom name tags at a company meet and greet, for example. If professional level color is what your after, it’s definitely worth considering, more than 10 million designers and producers around the globe use Pantone to help them create color accurate products.
Tip #2: Choosing the right colors. Lighter color values don’t always translate well using the CMYK process. In many instances, colors on the lightest 10 percent of the spectrum don’t translate at all. What this means is the subtle yellow or pink shading on your sticker may just look white to the casual observer—a look that can wash out your design. Similarly, designs that incorporate a lot of black will vary in effect depending on what color balances make up the black tone in the design. In other words, the colors that combine to create your black tone on your screen will determine what ratios of black and color ink go onto the page. The wrong design choices can result in tinted black hues or color casts. StickerRobot wrote brief and invaluable rundown on how to get both light and dark colors right the first time you print.
Tip #3: Permanence. Not all stickers are designed to last forever. Differences in ink, print process, and paper will result in differences in longevity, so it’s wise to confirm that you’re using the right materials (or ordering the right type of stickers from the press). Few things are more unfortunate for your brand than investing in a run of vinyl bumper stickers that peel and fade in less than a year, leaving unsightly remnants behind on your car. Not every sticker you make will need to stand up to the test of time, and not every sticker will have to face rain and sun fading. But if that’s your intention be sure to do your homework on your supply choices.
Tip #4: Die cutting. Shaping your stickers creates a strong visual effect that emphasizes your design elements. Die cutting is the quickest and easiest way to custom cut your stickers or decals to size. Professional presses often feature die cutting as an option for sticker printing making it quick and easy, but you can also choose to do it yourself with the help of a laser cutter. Some other considerations to keep in mind when printing from home:
Tip #5: Break up large areas of color. Printing consistent solid color over big areas isn’t easy (or cheap, for that matter). Pantone will print cleaner and more solid color but it does cost more than standard CMYK printing. Plus, you can’t really do it from home. Another solution is to avoid designing stickers with big areas of solid color.
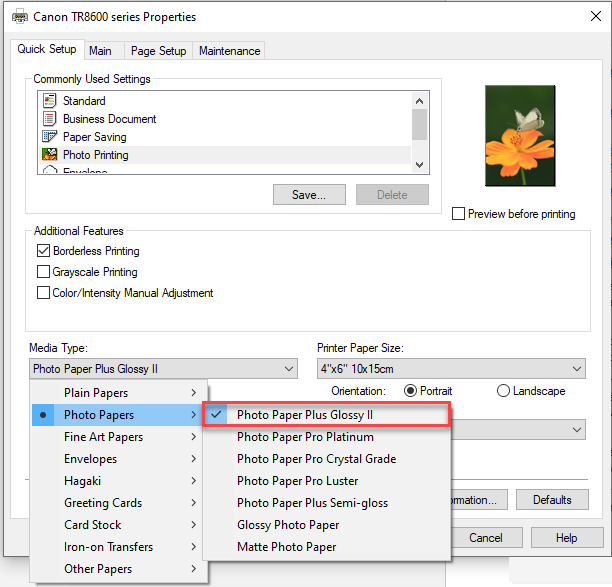
Tip #6: Select best print quality. Nearly every print driver features multiple degrees of print quality, designed to customize your print speed and the amount of ink used. When you’re printing high-quality stickers, you’ll want to switch to the best quality print mode. This will take longer than standard or draft mode printing, but the results will be much better. You can change the settings in the printer properties section of your printer menu and while you are at it, you will also want to select the correct type of paper or media. For example, on our Canon PIXMA TR8620, we changed the print quality setting from “standard” to “high” and selected the “glossy photo paper” setting for printing with our LD sticker paper. If you see a couple of glossy printer settings like in the screenshot below, the number just corresponds with the thickness of the paper. The larger the number, the thicker the paper. After you are done printing, give your stickers around 15-20 minutes to dry before you start cutting them out or applying them to anything. This allows time for the ink to settle into the paper and reduces the chances of smearing.

Tip #7: Ink cartridges. Always make sure your ink supplies are well stocked before printing out stickers. When one color or another is running low, it can cause your colors to come out wrong. And if you’re printing a number of stickers, running out of ink can lead to an untimely trip to the store to buy more. Yes, ink is expensive, but you can save a lot by purchasing compatible cartridges from reputable retailers. These cartridges are often made from the same component pieces as brand name cartridges, but custom refilled and tested to ensure great results. Plus, they cost as much as forty-to-fifty percent less than brand name ink.
Tip #8: Check for paper compatibility. Different printer models have limits on the thickness and proportions of the paper they print. This is especially true of compact laser printers, whose internal workings don’t work well with thicker papers. But chances are, if you’re thinking of printing stickers, you’re probably using an inkjet printer. Inkjet printers use either dye or pigment based ink and it would help to know what paper types work best with one over the other as this can also make a great difference in your overall print output. For instance our LD Glossy Sticker Paper–just like most gloss coated media–works great with dye-based ink. Once you know where to start, getting the results you want from your sticker or decal campaign is easy. Stickers are an often overlooked way to get the most bang for your marketing buck. Whether you’re making stickers on your own for an office event or doing a full professional print run as part a packaging giveaway, taking the time to make sure your design and supplies are right for the job will help ensure your happiness with the results.
How to Print on Avery Pre-Cut Inkjet Sticker Labels
- Prepare your template. Avery has free downloadable templates in Microsoft Word, Adobe programs, and Google Docs formats. All you need to do is download the right template for your Avery product and make sure your design fits the template.
- When your template is ready, the next thing you should do is print it on a blank piece of paper. Line it up with a sheet of Avery pre-cut stickers to check if the placement of your design is aligned with the labels. Make sure to fix the positioning before printing on the Avery pre-cut sticker sheets.
- Load sticker paper onto your printer. Check with your printer manual if it has any special instructions for loading sticker paper.
- Make sure the paper width lever doesn’t touch the edges of the paper so it doesn’t buckle.
- Print your finalized templates.
- Let the ink dry before removing the stickers from the sheet.
- Don’t print on the same sheet a second time as this might cause your printer to jam.
Sticker printing can seem like an intimidating task but once you’re familiar with the process and know what to look out for, you can then focus on expanding the creative aspect of your design–not the other way around. Familiarizing yourself with the technicalities of sticker printing first can save you frustration AND a lot of money. Do we have any sticker experts in the audience who’d like to contribute to this article? Feel free to chime in!
*Savings based on price comparison between remanufactured/compatible cartridge prices on www.LDProducts.com and OEM cartridge and printer prices from Amazon and Staples. All prices effective as of July 12, 2023. OEM names are registered trademarks of their respective owners and are not affiliated with, and do not endorse LD Products.

