
Print longer and replace cartridges less often with these simple Canon printhead cleaning tips.
Ever wonder why your prints sometimes appear faded or streaky? It’s usually because the printhead inside your printer is clogged or dried out. Like with most printers, Canon printheads can clog due to ink or dust drying up and collecting in the nozzle. A simple printhead cleaning can often get your printer running again (without having to replace your cartridges!) and in this quick guide, we show you how to do it.
What is a printhead?
The printhead sprays printer ink droplets through tiny nozzles to create a print. When one of these nozzles gets clogged your prints appear faded or streaky.
What are the types of Canon printheads?
Canon printheads can either be built into the cartridge or built into the printer.
How do you know what kind of printhead you printer uses?
Your first clue is in the cartridges…
Type 1: Printheads that are built into the cartridge
Canon printer cartridges with a built-in printhead are called integrated printer cartridges. These cartridges incorporate the printhead into the back of the cartridge. When you replace an integrated printer cartridge, you also replace the printhead so you never have to worry about a printhead wearing out over time. Canon sells black and tri-color integrated printer cartridges and the most are paired with inexpensive inkjet printers.

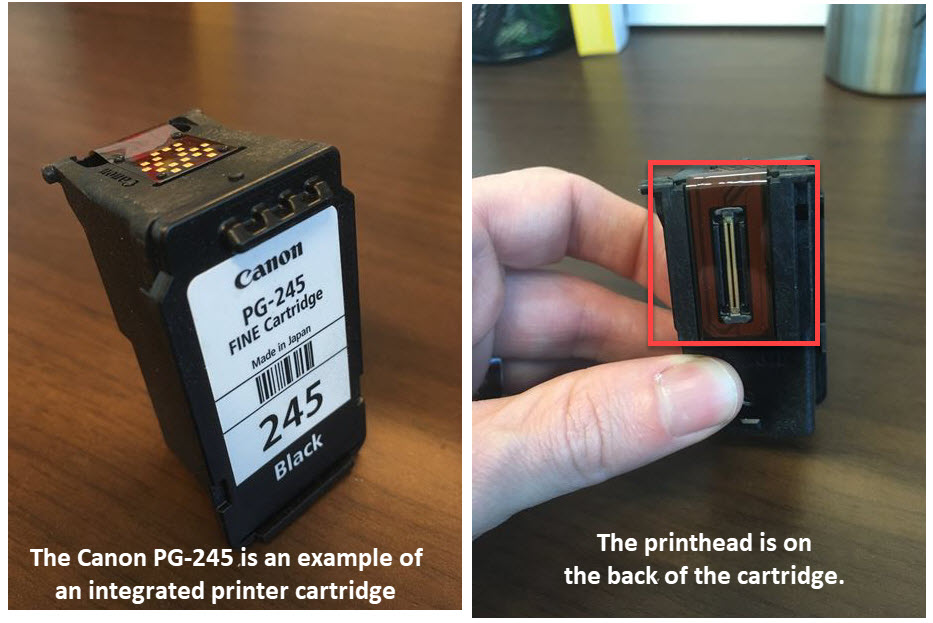
Integrated ink cartridge examples:
Canon PG-260 / Canon CL-261 series, Canon PG-245 / Canon CL-246 series, Canon PGI-250 / Canon CLI-251 series, Canon PG-240 / Canon CL-241 series


Type 2: Printheads that are built into the printer
Individual ink cartridges work with a separate, replaceable printhead that is included inside the printer. These cartridges are often much thinner than integrated cartridges and are sold in the 4 common printer cartridge colors: black, cyan, magenta and yellow. Some photo printers might require a few additional color cartridges, like a photo black or photo cyan. If you print a lot, you may need to eventually replace the printhead after extended use, however since most replacement printheads are just as expensive as the printer, many users end up just buying a new printer instead of a new printhead.

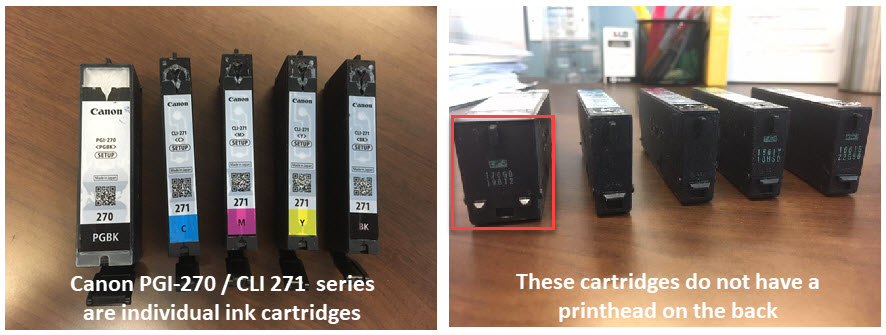
Individual ink cartridge examples:
Canon PGI-280 / CLI-281 series, Canon PGI-270 / CLI-271 series, Canon PGI-250 / CLI-251 series
Do Canon toner cartridges have a printhead?
No, toner cartridges do not use a printhead to create a print. Only inkjet printers use printheads, so if you have a laser printer, you do not have to worry about keeping the printhead clean!
How to automatically clean a Canon printhead
The simplest way to clean a printhead is with Canon’s built-in cleaning function. Both printers that use integrated ink cartridges and printers with individual ink cartridges include this function on their printer display screen. This is your first line of defense when you encounter streaky prints and it usually clears up the print quality problem right away. Check your printer user guide for the proper instructions for your machine.
We break down the instructions for the Canon PIXMA TS5020 printer below…
- Make sure the printer is on and then touch the setup (gear icon) on the printer display home screen
- Then select the maintenance (tools) icon
- Select “Cleaning” and then select “Yes”
- The printer will go through the cleaning process for about a minute. After it is done you can print a nozzle check test page to see if the cleaning improved the print quality

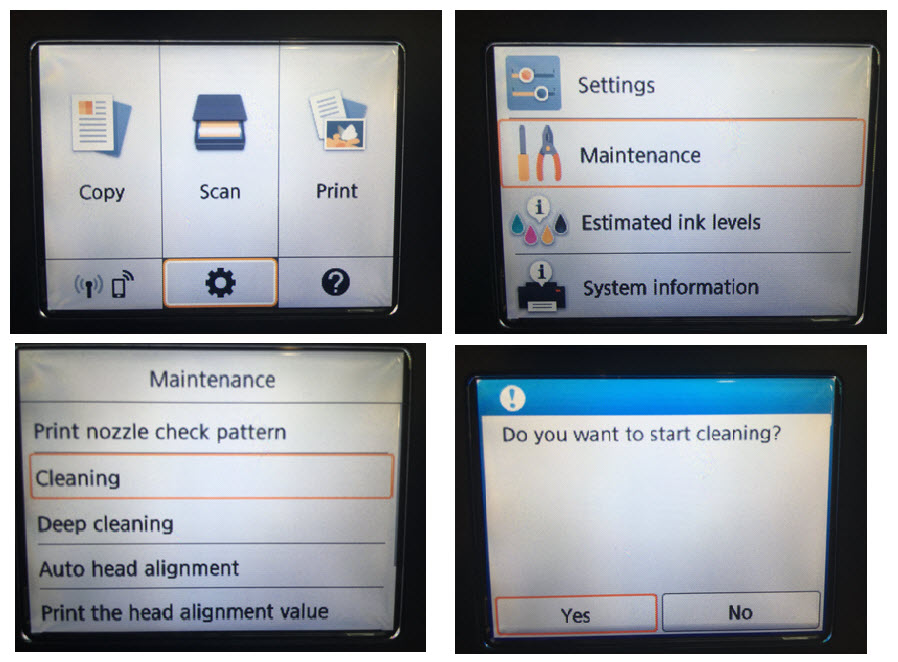
To print a nozzle check page, touch the setup gear again and “maintenance” again. Then select “print nozzle check pattern” and touch “Yes”. This will print the nozzle check page. If the colors look complete, the printhead is thoroughly cleaned and you can continue printing. If there are missing lines are streaks, you may want to run a second cleaning or run a deep cleaning on the printer.
To run the deep cleaning, follow the exact same steps as the regular cleaning above, except instead of selecting “Cleaning”, select “Deep Cleaning”. This process consumes more ink so you don’t want to run this function too frequently. If your cartridges still aren’t printing properly after running a cleaning, you can try replacing the cartridges to see if that clears up your print quality issue, or you can follow the steps below to try and manually clean the Canon printhead.
How to manually clean a Canon printhead
Sometimes the built-in cleaning function isn’t enough. With most Canon printers, you can take the cleaning process a step further by manually cleaning the printhead.
Manually cleaning an integrated cartridge
If your printer uses cartridges with an integrated printhead, you can try the “paper towel method” to fix your print quality issue.
Required supplies: A warm, damp paper towel and a dry paper towel
- Take a warm damp paper towel or coffee filter and blot the cartridge with the printhead facing down onto the paper towel. This will remove any dried ink on the printhead.
- Then, hold the cartridge with the printhead facing down against a dry paper towel for 2-3 minutes. A dry paper towel will wick the ink out. Do not wipe the print head as this may cause damage.
- Reinstall the cartridge and try printing again. If you are still getting poor print results at this point, you may need to replace your printer cartridge.


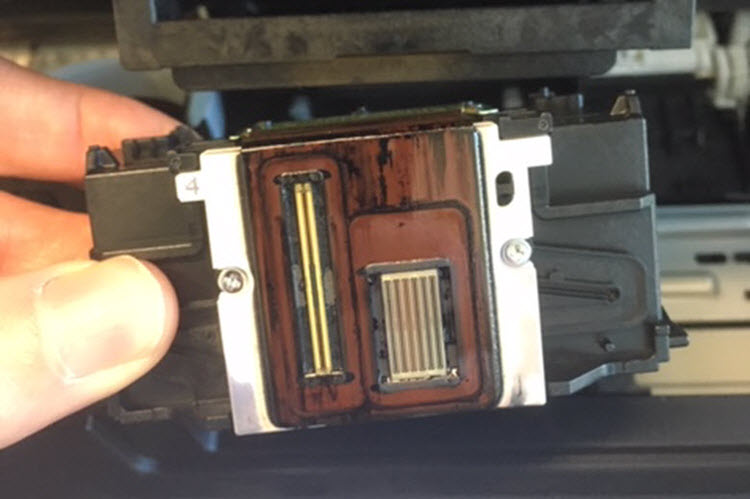
Manually cleaning printers with a removable printhead
The steps below are for Canon printers that use individual ink cartridges and have a removable printhead, like the Canon PIXMA TS9120.
How to remove a Canon printhead

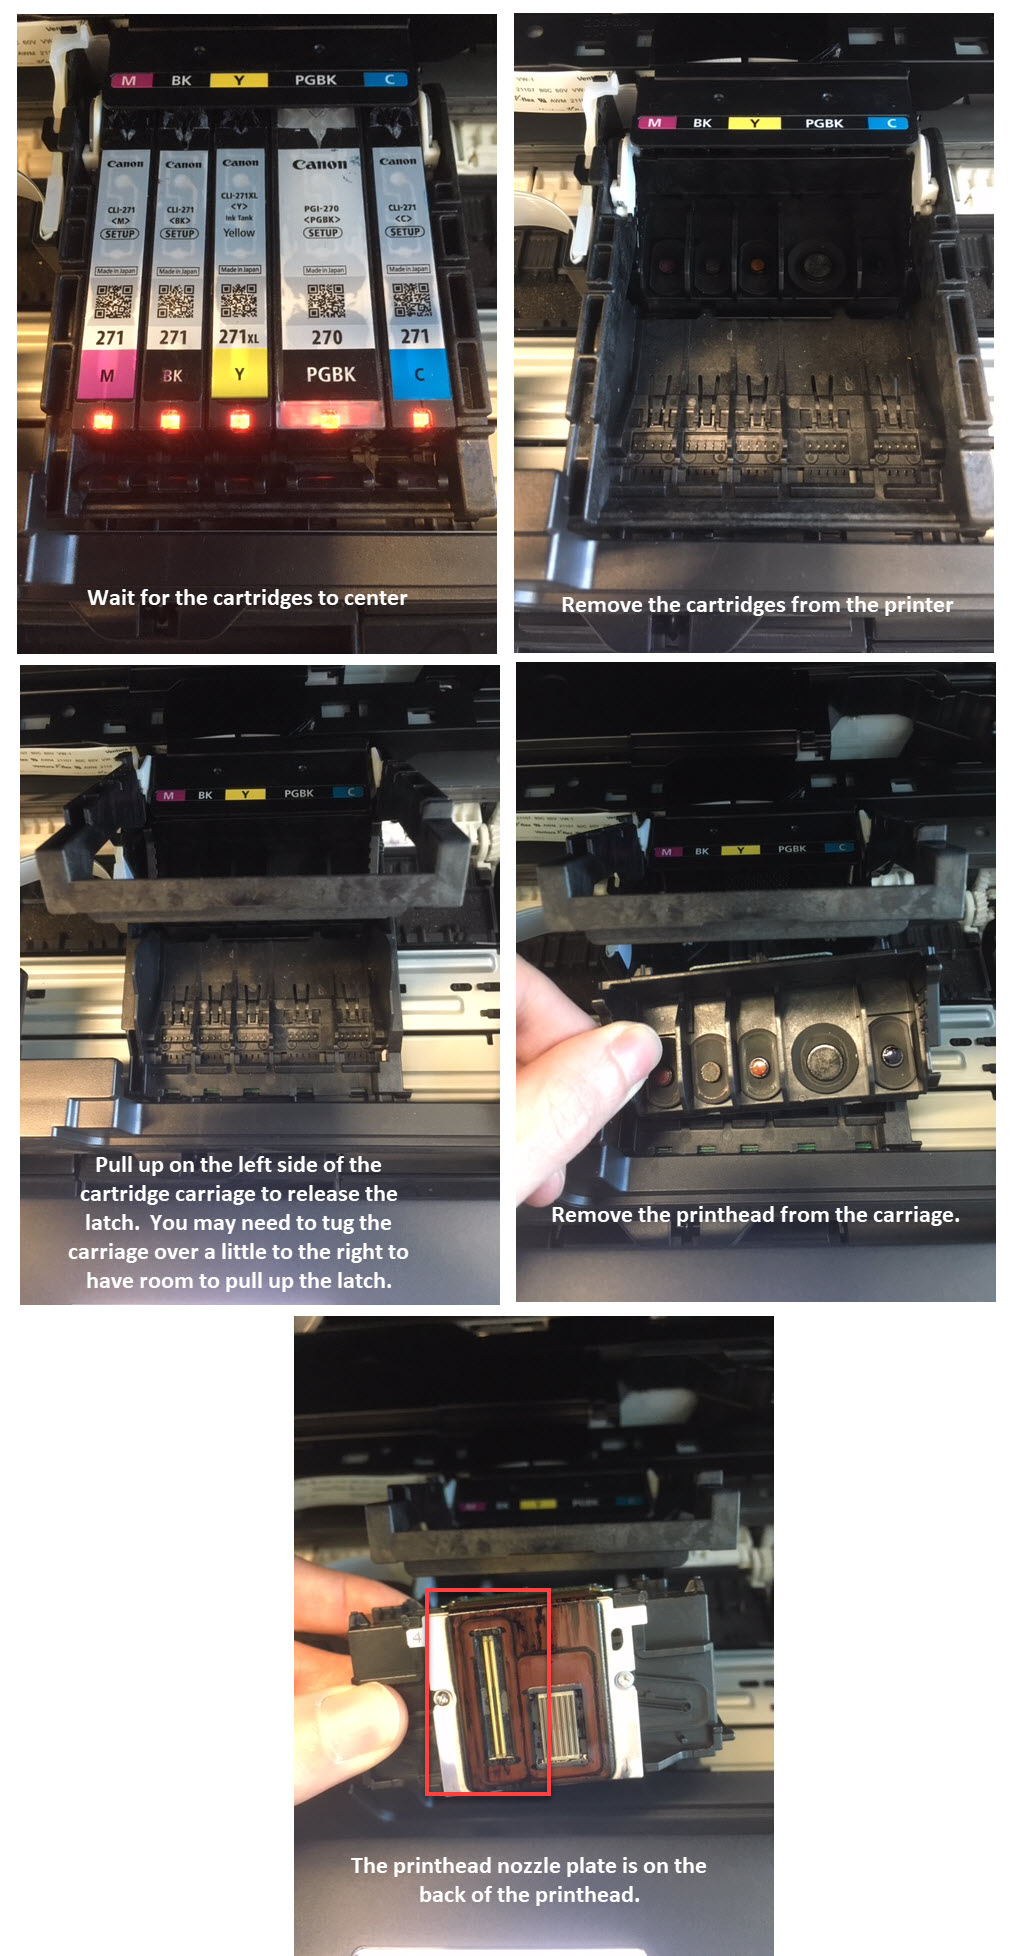
- Wait for the cartridges to center and then remove them from the cartridge carriage.
- Lift up on the latch that is cradling the cartridges to release the printhead from the printer.
- Pull the printhead up and out to remove it from the machine.
How to clean the Canon printhead
- Dampen the lint-free cloth with hot water and gently wipe away an excess ink on the printhead nozzle.
- Place the printhead in the container with the submerged paper towels. The nozzle should be facing down. Be careful not to touch the nozzle as it can be damaged easily.
- Let the printhead soak for about ten minutes. Then remove it from the container and set it on a dry paper towel to dry for fifteen minutes. The nozzle should be facing up.
- Reinstall the printhead back into the printer. Don’t forget to secure the latch! Then reinstall the cartridges and run the cleaning function on the machine again.
Regularly cleaning the printhead in your Canon printer helps your printer and your cartridges last longer. To prevent your printhead from clogging, we recommend printing at least once or twice a week to keep the printheads primed. You can also run the built-in cleaning function a couple of times a month, but keep in mind, it does deplete your ink, so you don’t want to run it too often. If you try these cleaning steps and are still not getting the print quality you need, you may need to buy new printer cartridges or replace the printhead altogether.

