

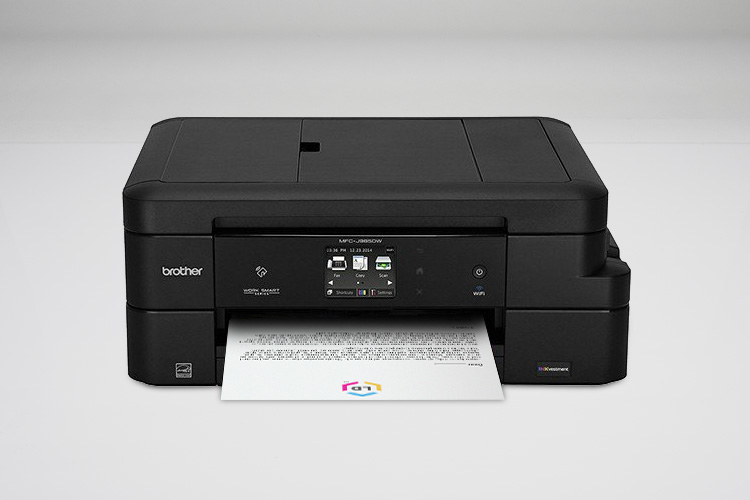
Find simple replacement instructions for your Brother toner cartridge and drum unit with this complete guide.
If you have never replaced the toner cartridge or drum unit in your Brother® printer before, you might find the process a little intimidating. In this quick guide, we’ll show you how to install both for a handful of popular Brother laser printers. Trust us, it’s easier than it looks! Installation steps can vary slightly depending on the printer and the consumable you are replacing but the process is pretty straightforward once you have an understanding of how the toner and drum unit work. Let’s start by reviewing the particulars of each consumable so you know exactly what you are putting in your printer…
A quick introduction to Brother toner cartridges and drum units.
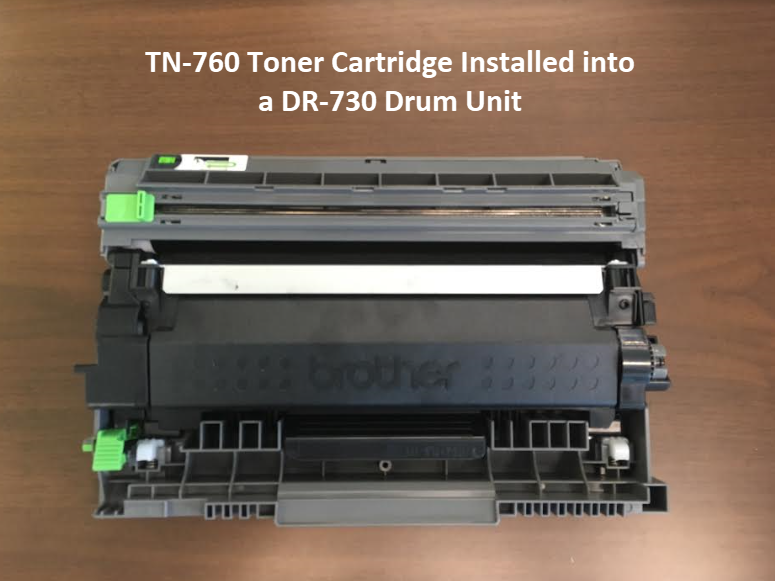
The toner cartridge and drum unit work together to produce a print. The toner cartridge is the container that holds the toner powder and the drum unit is an electrically charged cylinder that transfers that toner powder to paper to create text and images. Brother sells the toner cartridge and drum unit as two separate consumables. The cartridge is designed to fit into the drum and both are installed together as one unit into your printer:
Toner can be offered in a standard yield, high yield and extra high yield cartridge size. The high yield and extra high yield cartridges generally cost a bit more but print more pages for a better over all value. Not all Brother printers offer an extra high yield option so be sure to consult your printer manual to verify what’s acceptable for your machine. The drum unit is sold in just one size and is compatible with any of the previously mentioned cartridge sizes. Both the toner and drum eventually need to be replaced, but the toner cartridge is always the first to go.
Frequently Asked Questions
Why does my Brother printer keep saying replace toner?
This happens when your Brother printer’s toner cartridge is at the end of its life or running empty. Until you’ve replaced your toner cartridge with a new one, your Brother printer will keep prompting this message. We strongly advise against running on an empty toner cartridge for too long as this can cause your printer to overheat resulting in irreversible and expensive damages to your printer.
When do I replace a toner cartridge?
A toner cartridge requires replacement after it reaches the quoted page yield, or the approximate number of pages you can print with a specific cartridge (more about page yield here). You can find the cartridge page yield on the side of the cartridge box or on the specifications page of the printer manufacturer’s website. Your printer will let you know it is time to replace the toner with a “toner low” or “replace toner” message on the printer display.
Do I need to replace the drum on my Brother printer?
Yes, you do; especially if your printer is already displaying the Replace Drum message. Depending on your print volume and how often you print, you may or may not need to replace the drum unit in your laser printer. Home users for example might not have the same heavy print load as office users and might not need to replace their drum units. On the other hand, laser printers that see a lot of heavy printing daily will most likely need their drum units replaced perhaps once a year.
When do I replace a drum unit?
The drum unit is designed to last longer and generally needs to be replaced after the use of 3-4 toners. Brother keeps track of the drum life by counting the number of rotations of the drum. When a drum reaches the predetermined rotation limit to the related page yield, a “drum life end soon” message will appear on your printer’s display. If you are installing a new drum unit for the first time, you will need to reset the drum counter to restart the rotation count on your printer.
Why does my Brother printer keep saying replace drum?
Your printer will alert you when your drum unit is at the end of its life. Just like you need to replace toner cartridges when the toner powder runs empty, you also need to replace the drum unit to keep your printer in good shape. How do you fix a printer drum?
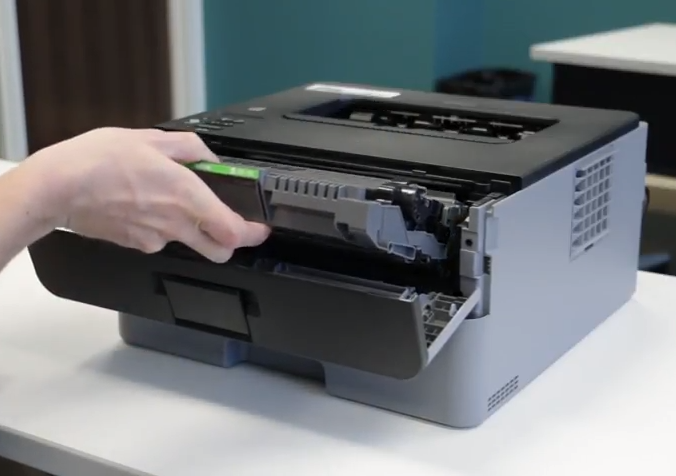
- Open the front cover of your Brother printer to expose your toner and drum unit assembly.
- Pull out the assembly.
- Unbox your new drum unit.
- Looking at your toner and drum unit assembly, push down the green lever to release the toner cartridge from the old drum unit and install it into your new drum unit.
- Discard old drum unit properly.
- Slide the toner and drum unit assembly back into the printer.
- Close the front cover.
What happens if I don’t replace the printer drum?
If you don’t replace your Brother printer’s drum unit, you will start to notice smudges, streaks, blank spots, and an overall decline in print quality. Replacing toner cartridges will not improve bad print quality results due to an expired drum unit.
How long should a drum last in Brother printer?
The drum unit lasts at least 3 times longer than a toner cartridge. And just like the number of pages each toner cartridge can print is different, the same is true when it comes to drum units. Drum units generally can print at least 12,000 pages before needing replacement. To find the actual number of pages your drum unit can print before it needs to be replaced, it’s best to refer to your printer’s manual or look up your printer model at our website.
Now that you are familiar with the basics, let’s begin the installation process! Here we will show you how to install the toner cartridge, the drum unit and reset the drum counter for a number of new Brother laser printers. We’ve broken out the installation instructions by printer list and their compatible consumables.
Before installation, you’ll need to prep your new cartridge or drum unit for the printer.
How to prep your toner cartridge
- Unbox the new cartridge
- Remove the cartridge from the packaging
- Remove the orange protective clip from the bottom of the cartridge
- Over a trash can, pull the seal tape out of the side of the cartridge. The tape should come out in one long strip and can be discarded after removal.
- Now you are ready to install!
How to prep your drum unit
- Unbox the new drum unit
- Remove the drum unit from the packaging
- Remove the orange protective clip surrounding the drum unit
- You are all set for installation!
First up, we’ll go over installation instructions for TN-630 / TN-660 toner cartridges and the DR-630 drum unit. These consumables work with all of the following printers:
Brother DCP‑L2520DW / DCP‑L2540DW / HL‑L2380DW / MFC‑L2680W / MFC‑L2685DW / MFC‑L2700DW / MFC‑L2705DW / MFC‑L2707DW / MFC‑L2720DW / MFC‑L2740DW
How to Replace TN-630 / TN-660 Toner Cartridges
- Turn on the printer and open the front cover.
- Remove the toner cartridge and drum unit from the printer.
- Release the toner cartridge from the drum assembly by pushing down on the green lock lever on the left side of the unit.
- Unbox the new toner and remove the orange protective cover.
- Slide the new toner into the drum assembly so it clicks into place.
- Install the complete unit back into the printer and close up the front cover.
Replacing a DR-630 Drum Unit
- Turn on the printer and open the front cover.
- Remove the toner cartridge and drum unit from the printer.
- Release the toner cartridge from the drum assembly by pushing down on the green lock lever on the left side of the unit.
- Unbox the new drum unit.
- Slide the toner into the new drum assembly so it clicks into place.
- Install the complete unit back into the printer and close up the front cover.
Reset the DR-630 Drum Counter
- Open the front cover
- Press and hold “Ok” for 2 seconds
- Press the up arrow or “1” to reset the counter
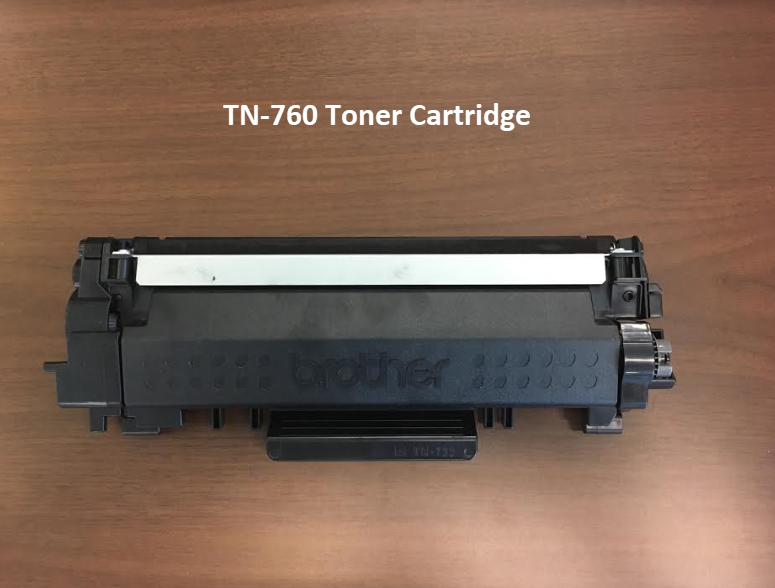
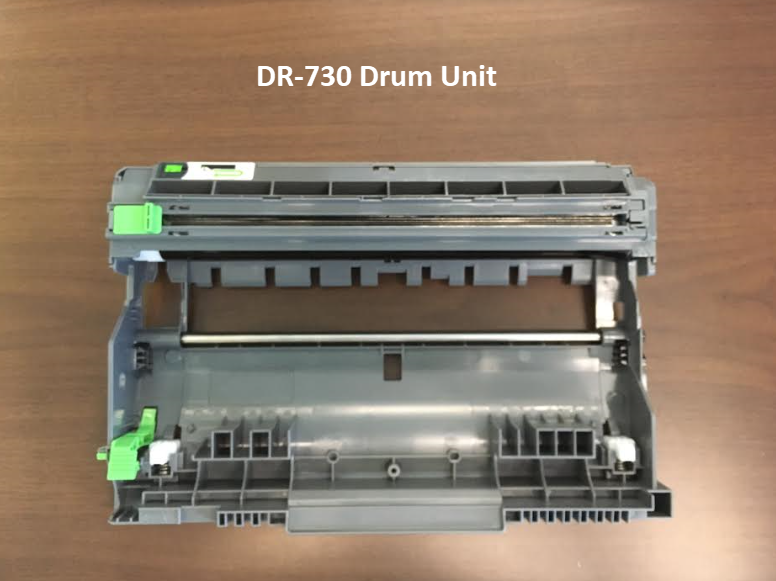
Next, we’ll review installation instructions for TN-730 / TN-760 toner cartridges and the DR-730 drum unit. These consumables work with all of the following printers:
Brother HL‑L2350DW / HL‑L2370DW / HL‑L2370DWX
How to Replace TN-730 / TN-760 Toner Cartridges
- Turn on the printer and open the front cover.
- Remove the toner cartridge and drum unit from the printer.
- Release the toner cartridge from the drum assembly by pushing down on the green lock lever on the left side of the unit.
- Unbox the new toner and remove the orange protective cover.
- Slide the new toner into the drum assembly so it clicks into place.
- Install the complete unit back into the printer and close up the front cover.
Replacing a DR-730 Drum Unit
- Turn on the printer and open the front cover.
- Remove the toner cartridge and drum unit from the printer.
- Release the toner cartridge from the drum assembly by pushing down on the green lock lever on the left side of the unit.
- Unbox the new drum unit.
- Slide the toner into the new drum assembly so it clicks into place.
- Install the complete unit back into the printer and close up the front cover.
Reset the DR-730 Drum Counter
- Before resetting the drum, make sure the machine is turned on and the front cover is closed.
- On the printer’s display, press “OK” and the up arrow at the same time.
- Then, press “OK”to select [Drum].
- Press the down arrow to reset the drum counter.

Next, we’ll review installation instructions for TN-820 / TN-850 / TN-880 toner cartridges and the DR-820 drum unit. These consumables work with all of the following printers:
Brother DCP-L6600DW / HL-L6200DW / HL-L6200DWT / HL-L6250 DN / HL-L6250DW / HL-L6300 DWT / HL-L6300DW / HL-L6400DW / HL-L6400DWG / HL-L6400DWT / HL-L6400DWX / MFC-L6700DW / MFC-L6750DW / MFC-L6800DW / MFC-L6900DW / MFC-L6900DWG / MFC-L6900DWX
How to Replace TN-820 / TN-850 / TN-880 Toner Cartridges
- Turn on the printer and open the front cover.
- Remove the toner cartridge and drum unit from the printer.
- Release the toner cartridge from the drum assembly by pushing down on the green lock lever on the left side of the unit.
- Unbox the new toner and remove the orange protective cover.
- Slide the new toner into the drum assembly so it clicks into place.
- Install the complete unit back into the printer and close up the front cover.
Replacing a DR-820 Drum Unit
- Turn on the printer and open the front cover.
- Remove the toner cartridge and drum unit from the printer.
- Release the toner cartridge from the drum assembly by pushing down on the green lock lever on the left side of the unit.
- Unbox the new drum unit.
- Slide the toner into the new drum assembly so it clicks into place.
- Install the complete unit back into the printer and close up the front cover.
Resetting the DR-820 Drum Counter
Every time you replace the drum, you will need to reset the drum counter.
- Open the front cover of the machine.
- Press and hold “OK” to display the [Drum Unit] option and press “OK.”
- Press the up arrow and select [Reset] to reset the counter.
Finally, we’ll cover installation instructions for TN-433 toner cartridge series and the DR-431CL drum unit. The drum unit for any color laser printer includes four slots for four toner cartridges (black, cyan, magenta and yellow), so you only need one drum unit for all four toners! These consumables work with all of the following printers:
Brother HL‑L8260CDW / HL‑L8360CDW / HL‑L8360CDWT
How to Replace TN-433 Toner Cartridges
- Press the release button on the front cover to open the front of the printer.
- Hold the green handle of the drum unit and gently pull the unit out.
- To unlock the toner cartridge, hold the handle of the cartridge and push it away from you. Once it is unlocked, pull the toner up and out to remove it from the drum unit.
- Slide the green tab from left to right a few times to clean the corona wire.
- Unbox the new toner cartridge and remove the orange protective cover.
- Install the toner cartridge into the drum unit and pull it towards you until it clicks into place.
- Using the green handle, slide the drum unit back into the printer so it locks in place.
- Close up the front cover of the machine.
How to Replace a DR-431CL Drum Unit
- Press the release button on the front cover to open the front of the printer.
- Hold the green handle of the drum unit and gently pull the unit out.
- Turn the green lock lever (1) counterclockwise until it locks in the release position. Holding the green handles of the drum unit, lift the front of the drum unit and remove it from the machine.
- Once it is unlocked, pull the toner up and out to remove it from the drum unit.
- Slide the green tab from left to right a few times to clean the corona wire.
- Unbox the new drum unit and remove the orange protective cover.
- Install the toner cartridge into the drum unit and pull it towards you until it clicks into place.
- Using the green handle, slide the drum unit back into the printer so it locks in place.
- Close up the front cover.
Reset the DR-431CL Drum Counter
- Turn on the printer.
- Press the up or down arrows to select the following:
- Then, select [Machine Info.] and press OK.
- Select [Parts Life] and press OK.
- Select [Drum] and press OK.
- Then, press and hold “OK”for five seconds.
- Press the up arrowto select [Reset].

We hope you found this guide helpful. If you have any questions about your toner cartridge or your drum, drop us a line in the comments below. And if you are looking to save money on your toner or drum, LD Products is a great low cost alternative to the Brother brand! We have affordable toner cartridges and drums for hundreds of popular Brother printer and we back them all with an industry-leading lifetime guarantee.


For the TN-630 and TN-660 toner and drums you’ve included info to reset the drum counter. How about information about resetting the toner counter? My first replacement toner came with a sheet on how to reset the toner counter. Used that for the 4 or 5 replacements I’ve put in. However, I need to replace the toner again and – of course – the sheet with the reset instructions is no where to be found. Would be great if you could add those button pushes on the LCD/button panel. Not intuitive.
Thanks!
Tom
Hi Tom, we are working on putting together toner reset content for our compatible Brother products, thanks for the suggestion! You can usually find that information in your printer user guide, which can be downloaded from the printer manufacturer’s website. Just search for your printer model and you can find the manual under “Product Support”
I have replaced the toner TN-760 but getting a message to replace the toner again. Is there anything i did not do? Tried to remove it again and push it back clicked. Door closed but still getting the same message. Any other problem?
There was a firmware update that time which would explain why you were unable to use the cartridge. Give us a call and we’ll send over a cartridge with an updated chip.
It always help when you put instructions in the package. It also avoids a lot of calls for tech support which you would think LD Products would want.
no shaking the toner? to distribute ink?
Yes, you can gently rock the toner cartridge back and forth to redistribute the toner powder, we recommend doing this over a trash can!
The piece of paper in the box for initial installation simply states
Remove the packing materials
Remove the orange part
Push Firmly
Shows something going in the side but nothing on what where and I am afraid I will break my employer’s printer to try to use it at home during this Covid crisis.
These are not good instructions for those of us that are not printer engineers for Brother
I have a color MFX0L3770CDW. A coworker replaced my black toner while I was out, after which all the print jobs had nasty smudges the length of the paper and about half the width. These smudges would vary in intensity at different times during the day. I checked all the troubleshooting guides. Since the toner had just been replaced (and during the pandemic it is very hard to find) I cleaned the drum several times (as if the first 3 times weren’t enough), wiped all the parts that were suggested, restarted everything, muttered curse words, etc. The Drums were all at 61%, but I finally replaced the black one anyway. This alleviated the serious black smudging but my copies still aren’t as clean as they were prior. (I can live with the few random streaks, due to the nature of our need for copies.)
My question: is it necessary to replace all the drums at the same time? I had to buy all 4 at once and the instructions indicated replacing all of them, but since the machine didn’t tell me to replace them I really didn’t want to if I didn’t have to. Thanks for your help.
Hi, since this printer uses a separate drum for each toner cartridge, you shouldn’t need to replace all of the drums at the same time. Did you try printing out the drum dot check sheet? This print out lets you know which drums need to be cleaned. When you are cleaning a drum, make sure you are rotating it so you clean all surfaces. You can find detailed instructions on page 567 of your printer user guide here: https://download.brother.com/welcome/doc100914/cv_hll3290cdw_use_oug_a.pdf
Hope this helps!
Thank you for the information. I had tried all the suggestions and followed all directions, multiple times. My problem is not spots on the paper, rather the entire sheet of paper is covered with a gray-scale smudge. Today I went ahead and replaced all the drums, but that didn’t help at all which is frustrating because all this stuff is expensive. I can’t figure out what else to clean. Rollers, drums, everything that was suggested in the user guide has been cleaned. Can anyone think of what might cause this allover grayscale but more importantly, how can I be rid of it? Thanks heaps. (PS I only just got this printer early this year, so I don’t think it is age.)
edit my above comment to say that I replaced the remaining drums. I had replaced the black on in my earlier email. thanks.
I have a brother TN 330. How do I replace drum. Just replaced ink cartridge and was $60. Now $100 for drum replacement. Is fine working 16 year old printer. There are reset drum instructions on your page but not for TN 330. Advise if worth keeping or through hassle of new one. Thanks.
Hi Beverly, is the printer advising you to replace the drum? You may not need to replace it just yet unless you are getting a “replace drum” message on your printer display. The drum usually does not need to be replaced at the same time as the toner. What printer model do you have? The steps are different, depending on what printer you own.
Thank you for the clear instructions in the video for replacing the toner cartridge.
I replaced my toner cartridge & somehow the drum unit now it’s stuck on the left side & I can’t remove the unit. Pulling out the drum locking strip doesn’t help. Also knocking noise when printer starts up & keeps telling me to remove toner & open front cover. Replaced toner & drum unit before without any problem. Right side moves a tiny bit but left side is stuck.