

It has happened to a lot of us. You install a brand new ink cartridge into your printer, hit “print” and eagerly anticipate the arrival of that first document. Then, nothing. Printers can instantly switch from lifesaver to frustrating if they stop working in the middle of an important print job and more often than not, the root cause can be difficult to diagnose. Here are a few troubleshooting solutions for some of the most common printer problems, so you can skip the headache and get your printer back on track.
Start with the basics:
Before you start troubleshooting, first double-check all of the basics. Make sure the printer is plugged in, turned on and properly connected to your computer. Check the printer settings on your computer and confirm that the printer is on your network and ready to print. Inspect the paper path for a paper jam. If you see any paper, gently pull on the page to remove it from the printer. If all of the basics check out, you might be able to pinpoint the problem with a couple of free troubleshooting diagnostics tools. Microsoft offers a printer troubleshooter for Windows 10 users on their support site. Apple users can find similar troubleshooting tips for Mac computers here. HP printer owners can also use their Print and Scan Doctor, just download the program and it will walk you through the appropriate resolution steps for your printer. Keep reading for more specific troubleshooting tips.
Fixing common printing issues:
The cartridge tries to print but nothing comes out on the page.
Blank pages typically occur due to a clogged print head or a faulty product but before you start troubleshooting, check to make sure that you have removed any protective tape from the cartridge. Most cartridges have an orange or yellow piece of tape that covers the vent hole and it must be removed before installation. If you install the cartridge with the tape still attached, it will not be able to print. We recommend removing the tape over a trash can, as some ink can escape from the cartridge during this process. To remove, gently pull the tape away from the cartridge. If you remove the tape and still are not getting prints, move onto our troubleshooting steps.
- The “paper towel” method
This troubleshooting technique is only relevant to printers that use an integrated ink cartridge. An integrated ink cartridge is a cartridge that has the printhead built into the cartridge itself. A few of the most common integrated ink cartridges include the HP 61, HP 63, HP 64, HP 65, HP 67, Canon PG-240 and Canon PG-245. Sometimes you need to prime the printhead to get the cartridge to start printing, especially if a cartridge has been sitting on your shelf for a while. To start, grab a warm, damp paper towel and a dry paper towel. Take the warm, damp paper towel and blot the cartridge with the printhead side down onto the towel. You should see ink appearing on the paper towel after blotting a couple of times. Be careful not to confuse the printhead with the gold and copper contacts or dots. After blotting onto the damp paper towel, hold the cartridge against the dry paper towel for 30 seconds to a minute. This process wicks out any dried ink that may be preventing you from a quality print. Once complete, insert the cartridge back in the machine and run a test print. Repeat the process a couple of times for best results. If the second time does not cut it, move on to our next tip, printhead cleaning.

- Run a printhead cleaning
Every inkjet printer has a cleaning function built into the printer. This function is used to prime the ink cartridges and improve print quality if a cartridge is running out of ink. How you run this function will vary, depending on which printer you own. You can usually find it under the “maintenance” or “settings” section of your printer’s menu, but you should consult your user guide for specific instructions. After running the cleaning, print out a diagnostic page or test print to determine if the cleaning worked. If the test pattern is crisp and includes all of the appropriate colors, your cleaning worked and you are good to print. If the quality is still poor after the cleaning, run a second cleaning. We don’t recommend running more than a couple of printhead cleanings at a time as this process does deplete the ink inside your cartridge. If you run a few cleanings and still aren’t getting the results you expect, you could be dealing with a faulty cartridge. Try a new cartridge and see if there is a difference. If the initial cartridge you tried turns out to be the issue, check for a warranty on the cartridge. If you have purchased recently there is a good chance that you qualify for a replacement cartridge.
The cartridge does not fit.
The first thing to check may seem obvious, but shouldn’t be overlooked. Make sure you purchased the correct cartridge for your printer! Cartridges are designed to work with their intended machine. Even compatible cartridges, which can sometimes look different than an original brand cartridge, should fit as expected. Consult your printer’s user guide for a list of accepted cartridge models. Standard yield and high yield cartridges will both work in your printer if they are listed. The main difference between a standard yield and high yield cartridge is the amount of ink inside the cartridge, not the actual physical size of the cartridge. Most high yield cartridges are the exact same size as their standard yield counterpart so fit should not be an issue. If you have the correct cartridge size and still cannot get it to fit, check that you are installing the cartridge into the correct slot. If you are trying to install a black cartridge into a photo black ink cartridge slot, it will not fit. For more information on the difference between a black cartridge and photo black cartridge, check out our help center article here. Some cartridges might require a bit of adjustment before you can insert them into the printer. If you have an individual ink cartridge, like an HP 564 that is not fitting into the cartridge slot, it may be due to the position of the plastic arm on the cartridge. Sometimes if the arm is not extended out far enough on the cartridge, it cannot properly snap into the printer. Gently pull outwards on the arm to extend it a bit more and insert the cartridge again.

The cartridge prints but the print quality is poor.
Faded or light prints are usually a symptom of a seldom-used cartridge. To get your print quality up to par, try the print quality troubleshooting steps we recommend earlier in this article. The paper towel method is recommended for integrated ink cartridges only. A printhead cleaning often does the trick for most other print quality concerns. Another area worth looking into is the printer settings on your machine. Print settings like “draft mode” might save on ink but your results will not look as crisp compared to a regular or optimal print mode. To fix, adjust the print quality settings in the print menu of the document that you are trying to print.
The printer does not recognize the cartridge.
Getting an error message when you have just installed a new cartridge can be incredibly frustrating. Messages like this are usually due to a communication issue between the chip on the cartridge and the printer. Follow these steps to get your cartridge working again!
- Cartridge error or incompatibility message
If you recently installed a new cartridge and immediately get an error on your printer that says “Incompatible Ink Cartridge” or “Ink Cartridge Error,” it’s likely an issue with the chip on the cartridge. Sometimes dried ink, fingerprint oil or tape residue can get on the gold and copper electrical contacts, causing the cartridge to not recognize properly in your machine. Gently clean the contacts with a lint free cloth or coffee filter and rubbing alcohol before installing to circumvent the error message.
Before reinstalling the cartridge, power down the printer, unplug the power cord and let the machine sit for about a minute. Then, power it back up, plug it back in and reseat the cartridge. A simple cartridge clean and printer reset usually will clear up a compatibility message right away.
If you attempt this a couple of times and still are not able to resolve the error message, you may have a faulty cartridge. Test another cartridge and compare the outcome, if the second cartridge works as expected then the initial problem cartridge might just be a bad egg. Faulty cartridges are not very common but they are always a possibility. Check your supplier’s warranty on faulty products, if you’ve purchased recently there is a good chance that you qualify for a replacement cartridge.
- Cartridge reads “empty”
An “empty” cartridge message may come up if you are using a remanufactured or previously used ink cartridge. This does not mean that you were sold a cartridge with missing ink, or that the ink refill process did not work. Since the cartridge is refurbished your printer is reading it as if it was still the original cartridge that has already been used. The chip on a previously used cartridge cannot be reset, which is why the printer thinks the cartridge is still empty. Even though your printer cannot tell, the cartridge is filled to capacity and should print the same amount of prints as an original. For most printers, you can simply ignore this empty message and continue to print as expected. To get around the message select “OK’ or “resume” on your printer’s display, this should allow you to continue printing. Keep in mind that you will not be able to track the ink levels of the cartridge due to the error message. Despite this, you should still get the same number of prints as an original brand cartridge. “Empty cartridge” messages are not common with original brand cartridges. An original product should be accepted by your printer immediately and read the appropriate ink levels on the display.
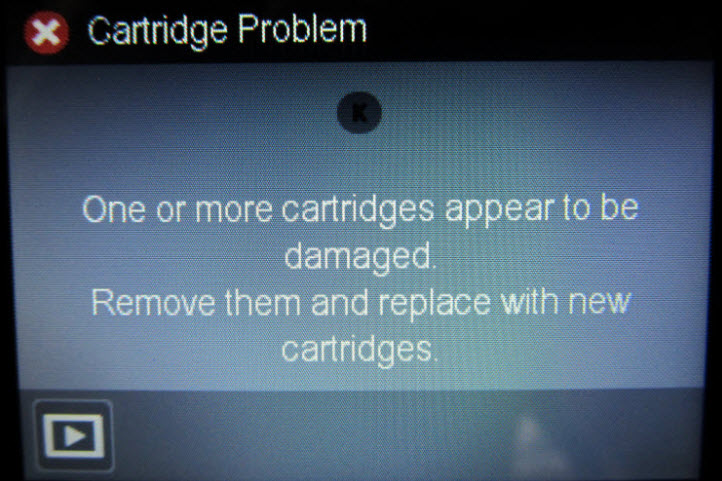
- Cartridge reads “missing or damaged”
Getting a message on your machine that reads ”ink cartridge missing” usually means that your ink cartridge may not be installed properly. The cartridge should click easily into it’s designated slot. If it is not installed properly, the cartridge could be angled wrong or installed in the wrong slot. If it clicks in easily and the message is persisting, take the cartridge out and try cleaning the contacts and resetting the printer (see cartridge error instructions earlier in the article). A reset will usually resolve an error message but if you continue to have issues, you might try a second cartridge and compare results.

The printer does not recognize the print job.
If you send a print job to the printer and the printer seems to be spinning its wheels, it could be that the printer is not properly communicating to your computer. Printers that have been idle for a while may need to be reconnected to the network or your wireless router. If the printer does not connect automatically when you turn it on, try restarting the wireless router and restarting your printer. You might need to update your printer driver or reinstall it completely to get your printer working again. Printer drivers are a part of the software you downloaded when you first installed your printer, and usually a quick refresh of that software you can get your printer running again. Without it, the printer cannot communicate with your computer. You can find the printer driver for your specific printer model by searching for it on Google or on your printer manufacturer’s website. The software is free to download!
I can’t find an answer for my printing issue.
When in doubt, search Youtube for a video on your printer’s specific troubleshooting issue. With so many printer models on the market, there is not always a straightforward solution for every printing problem. Each printer is unique, and with that, some printer issues can be unique as well. Printer forums can be helpful and articles like this one can cover the basic tips but sometimes you need something super specific that only a fellow printer owner or the printer manufacturer would be able to handle. Most printer manufacturers offer an extensive library of troubleshooting videos on their Youtube pages. The newer the printer model, the more likely there is to be a video about it. There are a ton of helpful videos created by regular printer owners too, don’t limit yourself to just printer manufacturer videos! You can also find tips and guides on the product support pages of the printer manufacturer. Canon® and Lexmark®, for example, have pages with specific troubleshooting guides for most of their newer printers. Your printer manufacturer’s tech support line is another solution too.
- HP®Product and Tech Support
- Brother®Product and Tech Support
- Epson®Product and Tech Support
- Canon®Product and Tech Support
- Dell®Product and Tech Support
- Lexmark®Product and Tech Support
- Samsung®Product and Tech Support
- Xerox® Product and Tech Support

We hope this guide was useful. Let us know about any other troubleshooting issues that you’d like assistance with by dropping a line in the comments, we would be happy to help. Good luck!


I have an HP Photosmart 5520 printer which uses 564XL cartridges. I just tried to replace my old yellow with and LD 564XL and I get the message “cartridge appears to be missing or damaged”. I replaced the other 2 colors (cyan and magenta) with no issues. So I replaced with a second LD 564XL cartridge-and got the same issue. So now I have gone to a different brand (not LD) cartridge and it works fine!! What is the problem here? Install was fine on both-seated and clicked properly. No excess ink or damage to cartridge.
Help!
John Selby
[email protected]
Hi John,
I am sorry you are having trouble with the 564XL cartridge reading properly in the printer. You might try cleaning the gold contact points on the end of the cartridge with a lint-free cloth and then reinstall. Sometimes if residue gets on the contact points it can cause an error message on the machine. If that doesn’t work, we back all of our compatible cartridges with a lifetime guarantee and we’d be happy to get a replacement cartridge out to you.
This printer is far from being a new machine. Even on the USA Canon website it says there is no help online or via phone. Thank you for your help with the Canon Pixma iP6220D. I installed 2 new cartridges at the same time and got sketchy print at best. After the paper towel method, all is well. How simple and makes so much sense. Many thanks.
HP Envy 5665: worked fine until I changed ink. I’ve cleaned heads, shut down, unplugged, restarted, uninstalled and reinstalled printer, indicated default printer, still insists I need to change ink and out of paper. when I try to power off, it stays in “shutting down” mode for ever until I just unplug it.
Since I am ready to throw it across the room, do I just need to replace it? I just spent $100 on new, now useless ink. Totally irritated with the product.
Hi Debra, it sounds like you have done all the right troubleshooting. If the printer is still fairly new, it may be under warranty and you could contact HP to see if they would be willing to replace it. Hope this helps!
I haven’t used my hp 2130 deskjet printer for a while, I put in new ink cartridges and it will not print.
Hi Dorothy, I would recommend running an automatic printhead cleaning to prime the cartridges, this should hopefully get them working again if they have been sitting for awhile.
To clean the printer, open the printer software on your computer. In the printer software, click Print & Scan and then click Maintain Your Printer to access the
Printer Toolbox. Click Clean Ink Cartridges on the Device Services tab and follow the on-screen instructions.
We recommend running the cleaning once or twice if quality doesn’t improve. If you still have trouble after trying the cleaning option, you may need to get new ink.
We’ve included a link to the printer user guide here:
http://h10032.www1.hp.com/ctg/Manual/c04649797.pdf
And a link to our cartridges for your printer here:
https://www.ldproducts.com/HP/Ink-Cartridge/Deskjet/2130/9983-Printer.html